
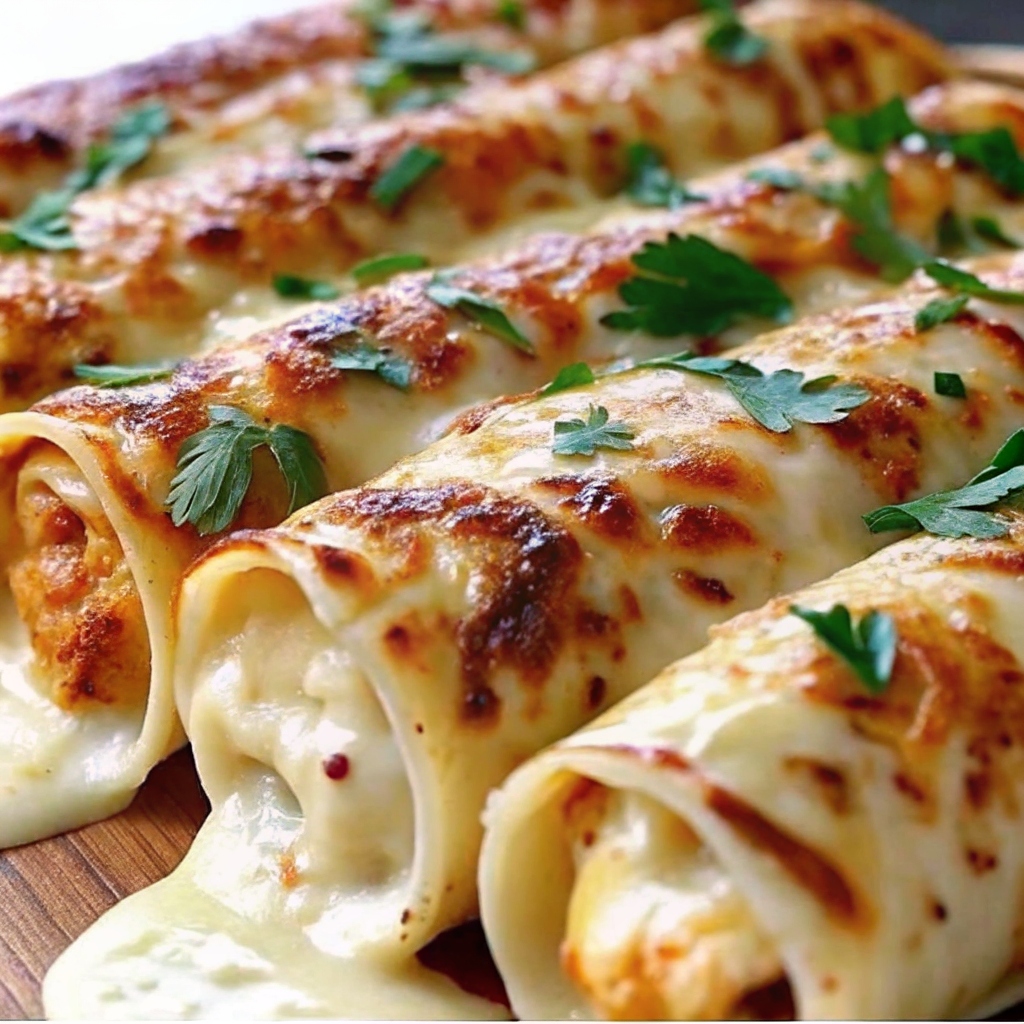
Cheesy Garlic Chicken Wraps: The Ultimate Comfort-Food Lunch or Dinner
If you’re a fan of cheesy, garlicky goodness wrapped in a perfectly crispy tortilla, this Cheesy Garlic Chicken Wrap recipe is about to become your new go-to meal. It’s got all the makings of comfort food — juicy chicken, a trio of melted cheeses, and buttery garlic flavor — all tucked neatly into a warm flour tortilla. Whether you’re meal-prepping for the week, looking for a quick weeknight dinner, or wanting a satisfying lunch on the go, this wrap checks all the boxes.
Why You’ll Love This Recipe
-
Triple Cheese Heaven: Mozzarella, cheddar, and Parmesan come together for the perfect mix of gooey, melty, and tangy flavor.
-
Protein-Packed Goodness: Shredded chicken breast adds lean protein and makes this wrap hearty and satisfying.
-
Garlic Butter Perfection: Each wrap gets brushed with buttery garlic and parsley before cooking — creating that irresistible golden crust.
-
Quick & Easy: From prep to plate in under 30 minutes.
-
Versatile Meal: Works for lunch, dinner, or even as a party snack when sliced into smaller pieces.
Ingredients & Their Roles
Before we get into the cooking steps, let’s take a closer look at what makes this recipe so flavorful and satisfying.
1. Chicken Breast (2 cups shredded)
The star of the show! Shredded cooked chicken breast provides a lean, high-protein base for your wraps. You can use leftover rotisserie chicken for convenience, or cook your own chicken breast by baking, grilling, or poaching it. The mild flavor of chicken pairs beautifully with the rich cheeses and garlic butter.
2. Mozzarella Cheese (1 cup shredded)
Mozzarella adds that gooey, stretchy texture that makes every bite divine. Its creamy, mild flavor perfectly complements the chicken and balances the sharpness of the cheddar.
3. Cheddar Cheese (½ cup shredded)
Cheddar introduces a slight tang and sharpness that enhances the flavor depth of the wraps. When mixed with mozzarella, it creates that perfect cheesy pull with a bold, comforting taste.
4. Parmesan Cheese (¼ cup grated)
A little goes a long way with Parmesan. It adds a nutty, umami-rich kick that brings sophistication to this otherwise simple comfort meal.
5. Large Flour Tortillas (4)
The wrap that holds it all together! Choose soft, pliable flour tortillas — they crisp up beautifully in the pan while staying tender inside. They also make the wraps easy to eat on the go.
6. Unsalted Butter (3 tbsp) & Garlic (2 cloves, minced)
The combination of melted butter and fresh garlic creates a luxurious garlic butter that coats the wraps before cooking. It helps them crisp up evenly and fills your kitchen with a mouthwatering aroma.
7. Dried Parsley (1 tsp)
Parsley adds a mild herbal note and a touch of green color that makes the wraps more visually appealing. It also rounds out the flavor of the garlic butter.
8. Salt and Pepper (to taste)
Simple but essential — these seasonings tie all the flavors together, ensuring every bite is balanced and flavorful.
Step-by-Step Directions
Step 1: Prepare the Filling
Start by shredding your cooked chicken breast into small, bite-sized pieces. In a large mixing bowl, combine the shredded chicken with mozzarella, cheddar, and Parmesan. Mix well until the cheese is evenly distributed and coats the chicken.
Tip: Warm your chicken slightly before mixing if it’s cold — this helps the cheeses start to melt and blend better.
Step 2: Assemble the Wraps
Lay a tortilla flat on your counter or cutting board. Spoon about ½ cup of the chicken and cheese mixture into the center. Fold in the sides first, then roll the tortilla tightly from one end to the other to form a compact wrap. Repeat for all four tortillas.
Pro Tip: If you want a tighter wrap, warm your tortillas for 10–15 seconds in the microwave before assembling — this makes them more flexible and easier to roll.
Step 3: Make the Garlic Butter
In a small skillet or saucepan, melt the butter over medium heat. Add the minced garlic and dried parsley, and cook for 1–2 minutes until fragrant (but not browned). Season with a pinch of salt and pepper.
Note: Be careful not to burn the garlic — it should stay lightly golden for the best flavor.
Step 4: Cook the Wraps
Heat a large skillet or frying pan over medium heat. Brush each wrap generously with the garlic butter, coating all sides. Place the wraps seam-side down on the skillet. Cook for 2–3 minutes per side, turning gently until all sides are golden brown and crispy.
The cheese will melt inside, creating that perfect oozy center.
Step 5: Serve and Enjoy!
Remove the wraps from heat and let them rest for a minute before slicing diagonally. Serve them warm with your favorite dipping sauces — marinara, ranch, or even garlic aioli are excellent choices.
Serving Suggestions
These wraps are delicious on their own, but if you’re serving them for dinner or a casual gathering, here are some fun pairings:
-
Side Salad: Pair with a light green salad with lemon vinaigrette to balance the richness.
-
Crispy Fries or Potato Wedges: Because who doesn’t love cheesy wraps with fries?
-
Soup Combo: A bowl of tomato basil soup makes a cozy pairing for these wraps.
-
Extra Garlic Butter Dip: Double down on the flavor with a small bowl of melted garlic butter for dipping.
Tips for the Best Cheesy Garlic Chicken Wraps
-
Use fresh garlic: Freshly minced garlic gives the butter its best flavor and aroma.
-
Avoid soggy wraps: Don’t overfill — a moderate amount of filling ensures even cooking and crispiness.
-
Cheese choices: You can substitute or add cheeses like Monterey Jack, Provolone, or Gouda for variety.
-
Make ahead: Assemble the wraps and refrigerate them for up to 24 hours before cooking. Perfect for meal prep!
-
Air Fryer Option: Cook at 375°F (190°C) for 6–8 minutes, turning halfway, for an extra crispy finish without added oil.
Healthier Variations
-
Low-Carb Option: Use low-carb or whole wheat tortillas.
-
Dairy-Free: Try vegan cheeses and olive oil instead of butter.
-
Extra Veggies: Add sautéed spinach, bell peppers, or caramelized onions for more nutrients and color.
-
Spicy Kick: Mix a bit of hot sauce or red pepper flakes into the chicken filling for heat lovers.
Storage and Reheating Tips
-
Refrigerate: Store leftover wraps in an airtight container for up to 3 days.
-
Freeze: Wrap individually in foil or parchment and freeze for up to 2 months.
-
Reheat: Use an oven or air fryer to reheat for best texture — about 350°F (175°C) for 8–10 minutes. Microwaving works in a pinch, but it softens the tortilla.
Nutritional Breakdown (Per Wrap)
Approximate values — may vary based on ingredients used.
-
Calories: 450
-
Protein: 32g
-
Fat: 24g
-
Carbohydrates: 28g
-
Fiber: 2g
-
Calcium: 25% DV
Frequently Asked Questions (PAA)
1. Can I use rotisserie chicken for this recipe?
Absolutely! Rotisserie chicken is a great time-saver and adds extra flavor to your wraps.
2. What’s the best cheese combination for chicken wraps?
A blend of mozzarella for stretch, cheddar for tang, and Parmesan for umami gives the perfect balance of flavor and texture.
3. How do I keep my wraps from getting soggy?
Avoid overfilling, make sure the garlic butter is not too heavy, and cook on medium heat for a crispy finish.
4. Can I bake these instead of pan-frying?
Yes — bake at 400°F (200°C) for 12–15 minutes, flipping halfway through, until golden and crisp.
5. What sauces go well with cheesy chicken wraps?
Try ranch, marinara, chipotle mayo, or creamy garlic sauce for dipping.
Final Thoughts
These Cheesy Garlic Chicken Wraps are the definition of comfort food — quick, satisfying, and full of flavor. The combination of melted cheese, juicy chicken, and garlicky butter makes them irresistibly good, while the crispy tortilla gives every bite a satisfying crunch. Whether you’re cooking for yourself, your family, or meal prepping for the week, this recipe will have everyone asking for seconds.
So, grab your tortillas and get cooking — because cheesy garlic perfection is just a few steps away!
For more recipes follow me in Facebook , Pinterest !